Published 19 November 2015 ● Last Updated on 8 October 2020
In September 2015, we launched the #Under50Dollars Challenge, our creative twist to #SG50, to commemorate the 50th birth-year of Singapore. It was devised for our readers to appreciate the inherent value of things used and old. If you have a good eye, enjoy upcycling… and have some dollars in the pocket, you too can join in and take up the challenge!
We are truly humbled by the response and the enthusiasm our readers have shown. Kudos to recycling, reusing and reducing waste! Glad to see so many responsible individuals joining us in our genuine albeit small attempt to make a difference :-). Our latest entry comes from Radhika Behuria and Jeff LeBlanc in Singapore. Both are hot-shot super busy young executives who surprised Secondsguru by sending in their beautiful entry for the challenge.
In their words:
“If you want a thing done well, do it yourself.” A famous saying by a very famous man. Although I don’t think Napoleon Bonaparte was thinking along the same lines as me when he came up with that statement, it definitely stood true for me and my husband very recently.
We recently moved into our new home in Singapore, a dream come true for us. We have had little and large ideas and creative streams of thoughts running amok about how we would want to add our own style to our new abode.
However after a spate of episodes with contractors who had interest neither in our vision, nor in providing any creative element to the work being carried out, we decided to take things into our own hands, literally. And that’s exactly how my husband and I came upon our first DIY project and our entry into the Secondsguru Under50dollars challenge.
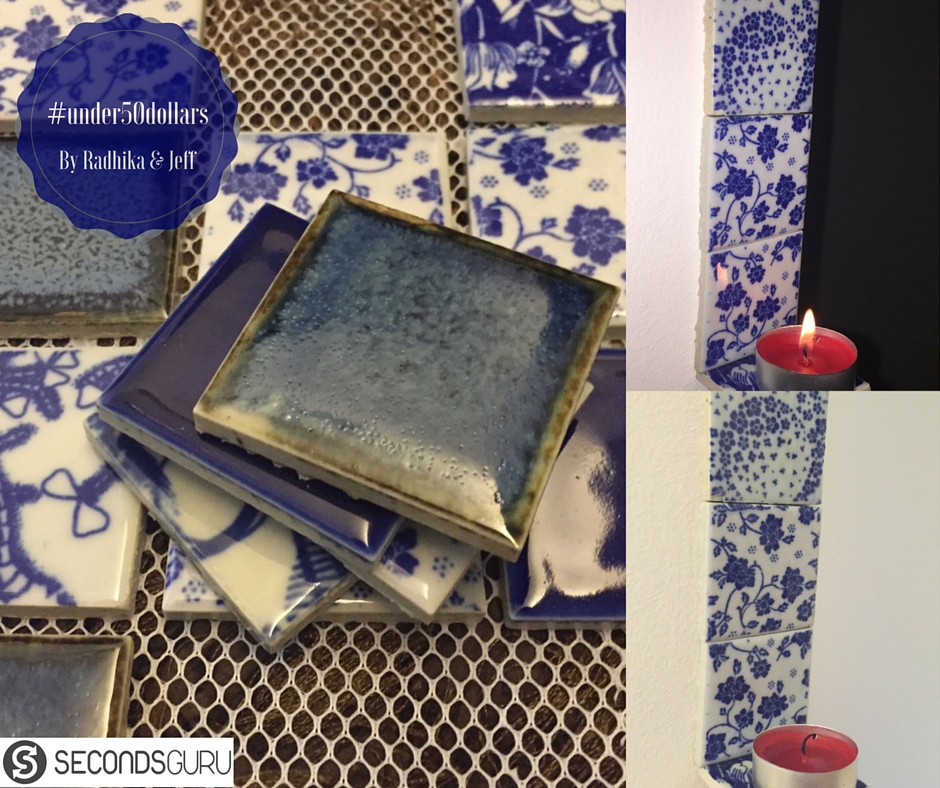
Perhaps one of our most favourite rooms in the house is our “lounge room” that serves as a reading corner, a cozy seat for a movie marathon and a perfect date night spot with a glass of vino! We wanted our lounge room to have ample low lights and lots of candles- but something with a twist. And candles is where it all started…We had some leftover tiles after the home renovation was completed (We bought ours at An Huat Trading, opposite Great World City) when we came across the #under50dollar challenge from Secondsguru. We always wanted to do something interesting in our lounge room, particularly for the candles, and we definitely wanted to use up the leftover tiles, so we let our creative juices flow. This is how we came up with the idea to make a cool colour-tiled wall candle holder with the pieces. It was done in three simple steps:
1. Think colours: We wanted to go with blue in our case as it allows for different shades and hues to match with all the other stuff in our room.
2. Match the patterns: Because the sheet of tiles you get is in random prints, you should make sure that they would look good together when they are stuck next to each other. Then select three patterns to go together for each candle light holder.
3. Stick ‘em together: All you need is some super glue and stick three selected tiles together, let them dry for an hour or so and then put them on the wall. Then mount the final tile where the tea-light candle will sit.
Not only did this cost us just 25SGD, it’s also our grand trophy on the wall- everyone whose visited has loved the idea.
-Radhika
Radhika and Jeff are based in Singapore. She works in a large corporate in a CSR role and he in a management role for a well-established logistics firm. They have been married for a year and set up their beautiful home in Singapore just a few months back. Both share a passion for biking, boxing and honestly working out in any form! They are serial travellers, keen samplers of wine (in copious amounts) and love putting their culinary skills to test!
Leave a comment here or email us on blog@secondsguru.com if you like this write up!


0 Comments