Published 6 October 2019 ● Last Updated on 17 July 2020
In this concluding article on the Sari Strategy series, guest author Sathya Bhavana, the founder of ‘Re’vastra, shares artistic ways in which one can ReStyle pre-loved saris to make something new, ensuring minimal wastage of your heritage textile- all you need is some constructional techniques and excitement to try something new. The good news is that her technique can be applied to any pre-loved material which has a basic rectangular shape- a sarong from SriLanka, Indonesia or East Africa as well.
So normally, what would you do with a lovely old sari of yours? You would either a) try to find someone to transform it into clothes b) try your hand at locating online Do-It-Yourself tricks (DIYs) that would be quick to do and fun. Unfortunately the core of both techniques would be to chop the fabric and generate leftovers or scrap in the process. Now, what if there is a way to minimize this cutting and maximize the sari, where the primary focus is to ‘save the heritage textile’ rather than ‘make the garment’? Would you now be able to re-visualise this story? Yes. Nevertheless, to make this idea a tad clearer, let us backtrack and then list a few ways to repurpose your sari at home without creating too much waste.
As mentioned in the earlier Sari Strategy Repurposing #01 and Sari Strategy Repurposing #02 stories, the sari is an unstitched and rectangular piece of fabric derived from Vedic clothing — Uttariya (upper, shoulder drape), Antariya (lower, skirt-like drape) and Sthanapatta (chest wrap or covering, knotted at the back, front or side). All these silhouettes were pretty rudimentary in nature. They were flat rectangles. But their styling involved a few techniques, which were draping, pleating, folding, knotting and tucking. Together they contoured the body. Although most wearers used these methods very organically in varied permutations and combinations, the end style was more functional than trendy, and pretty androgynous (unisex or gender neutral) in nature, too. Think Dhotis and shoulder wraps worn by common men in that era. Of course, aristocratic styling was an elaborate and a different ball game altogether.
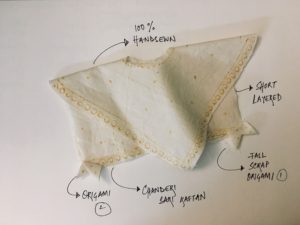
Now, what if this Vedic philosophy of organic design is infused into the aesthetic of repurposing a sari to make contemporary garments or accessories? Result: You will have simple end products with little hearts. No, nothing out of the ordinary, yet amazing. Why? Because they would intensely challenge your creative cells, mindfully make use of all your bodily senses, and gently push your fingers and hands to make something crafty. Here are the initial to-dos:
1. Lay out the chosen sari flat on a large table or on the floor. Get a top or bird’s eye view. Stand on a chair if you want!
2. Keep in mind the Indian State from which it is and its fabric mix. Check the flow of the visual design — weave, print, pattern, embroidery, appliqué, or other detailing.
3. Divide the yardage into portions by trying to work around the design (this is where ‘prevention’ of creating waste comes in). You will notice the sari throws out simple geometric chunks — rectangles, squares, triangles, circles or parallelograms —at you.
4. Visualise it like a puzzle that can use maximum fabric. Remember, this stage of design thinking is not rocket science. It is pure and logical play of simple lines and forms.
5. Finally, fit the pieces in and convert each geometric shape into a garment. Use and add simple contouring and constructional techniques (draping, pleating, folding, knotting and tucking) to shape the useables.

If you are unsure, first map this on paper or waste fabric. Make miniatures to scale if you can. Stitch or glue where needed to understand the flow of the shapes. NOTE: You may fail miserably. But do not give up. Kaftan, skirt, scarf, stole and bag are some of the simple ReStyles that can be made effortlessly by using the folding technique. Put on your thinking hats to modulate other techniques. You can make a combination of these styles from one sari or use parts of various damaged saris to make different pieces. The core idea is to maximize the fabric and minimize wastage. Period. NOTE: These repurposed clothes can work wonders for your lounge or at leisure wardrobe (read weekend, meditation, movie, read or laze-in) as mix-and-match pieces. This will also prevent you from buying some simple-but-newer pieces on a whim.
Kaftan
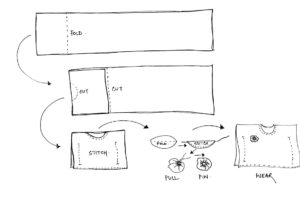
Kaftan is one of the most minimal silhouettes you can come across. This garment (a Persian word) is known to have originated in Ancient Mesopotamia according to Vogue Arabia in one of its stories. To create this yourself, just fold the sari from one end to the desired length. Cut this depending on what you want — long or short style. Swivel it. Scoop the neckline out. Finish it with a tape. Cover this with small or long running stitches. Now stitch the sides with running or back stitches, hem the bottom (if you have used one finished end of the sari you may not need to hem that part) and voila! Your breezy kaftan is ready. You can fold, stitch and gather the circular, square or elliptical neckline scrap into a handcrafted corsage or appliqué it at the back.
Scarf
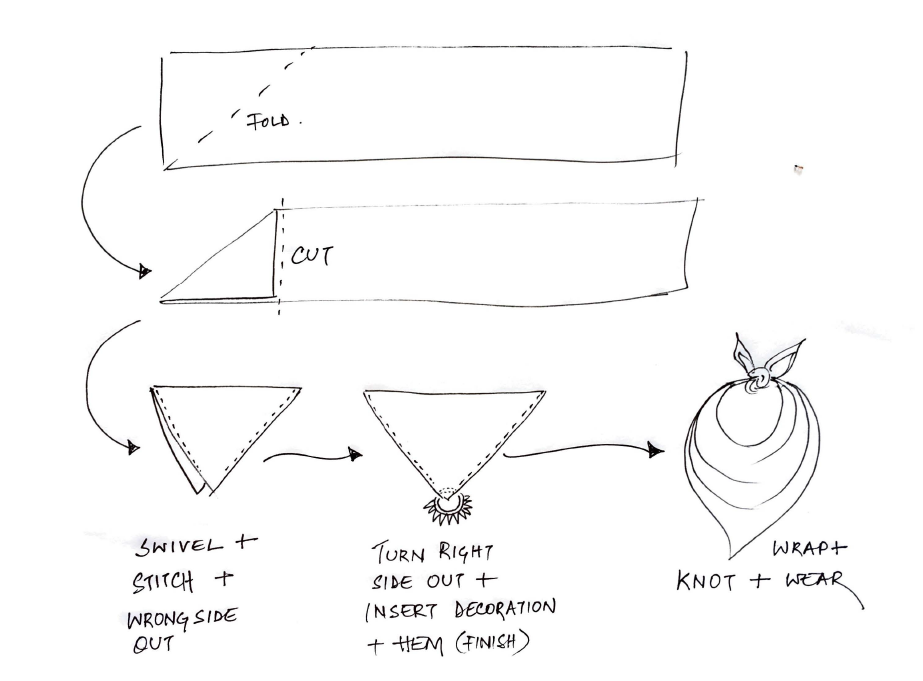
Its roots are firmly planted in ancient civilizations like Egyptian, Greek, Roman, Chinese and even Indian. But a repurposed scarf crafted out a sari needs a softer hand. The lighter the sari fabric, the better would be the drape. After you lay the sari flat, take the opposite corner end of the sari and diagonally fold it half to make a large, double-layered triangle. Hem the diagonal sides, turn it inside-out and finish. Or add an interesting lace or tape as alternate finishing. Before finishing, you can even squeeze in fun tassels or material decoration to add an element of interest. Now, drape this scarf around your neck, knot it at the nape and let it fall organically into cowls at the front.
Make It Yourself Restyle – Scarf
Stole
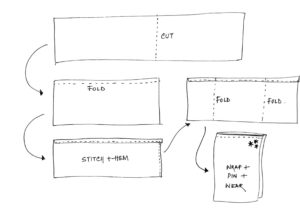
This versatile band of cloth (derived from Latin stole and Greek stolē) historically had religious and other symbolic connotations. Indian version is Uttariya. The play is usually of the width and the length. While creating this from an old sari you can variate the length according to your need. Fold the sari piece horizontally to get the narrow shape. Hem or tape-finish the short ends of the sari. Stitch the long ends together to make a double-layered piece. Turn it inside-out. Again, you can add contrasting lace or any leftover fabric (could be mini pleated) to the short ends or long ends (or both) to make it vibrant. Finishing with thick-yarn running stitches is another style variation. You can double-wrap around your neck or throw it around your shoulders.

Skirt
This silhouette has dominated clothing choices for eons and civilizations — Bronze Age, ancient Egyptian (Shendyt was a long skirt for men), Chinese, Middle Ages and others. Cut to India you have Domdyan, Baku and Mekhela-Chador for women from the Northeast, and the lungi, mardani, chaadra, dhotar, panchey, panchi or mund for men from different parts of India. To make one for yourself, wrap the sari around your waist to check what is the required wrap length. Cut it along the width. Finish the end (other one is anyway pre-finished). Fold the border into half and hem to make the belt. Hand-stitch loop buttons (inside and outside), quirky drawstrings with pom-poms or tassels where you want it to be clasped at your waist. You can also patchwork and use any leftover borders to make a contrasting belt with extended tie-ups. Alternatively, you can use pin-ups or brooches as quick-fix.
Bag
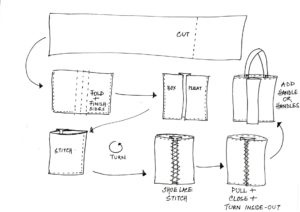
For centuries, these fellows have been-there-done-that when it comes to shapes and materials depending on their usage. Think animal skin, plant fibres, bark, cloth and now unbelievable materials. Or dump-all, furoshiki, hobo, tote, duffle, satchel, messenger, and the like. You can craft a simple, box-pleated one from your sari. Just use any narrow width piece of the sari. Could be the front decorative end (pallu) if it has heaviness (body). Finish the sides by stitching or hemming them. Fold half. Box pleat at the centre as much as needed. Don’t forget to stitch the bottom to make it tubular. Turn this inside-out. Attach leftover fabric straps, borders or canvas belt as handles. You could also stitch cord tie-ups at the centre to secure the mouth during use.
Here are some stitching tips to help you get started:
– Start with simple running stitches if you aren’t confident with stitching. Then learn back stitch, blanket stitch, cross stitch or chain stitch. There are many tutorials online.
– If you do not like hemming, pick double-sided fabric tape or sheet (to cut desired shapes and curves) that can be ironed on to fuse the fabric sections. For this, crawl online or buy at sewing supplies’ stores in your locality. Websites like thesprucecrafts.com have other no-sew fabric fusing techniques.
– Another shortcut (but not easily recommended by experts) is using clear nail-paint to secure the fraying edges of the sari. This however may not last long and is more of a cheater’s tip.
– Sathya Bhavana is an India-based fashion writer/editor and the founder of Indian Slow Fashion Label Revastra ( @re_vastra). It tells nostalgic and spiritual fabric tales by redesigning or repairing saris of and for fearlessly creative individuals. The design aesthetic (#rephilosophy) is a mix of three concepts Vedic, Zen and Zerowaste. The label’s workshops encourage sari wardrobe management and mindful hand stitching / crafting using 3Rs+3Ps (#saristrategy).
All the illustrations and images are by Sathya Bhavana



0 Comments