Published 16 June 2020 ● Last Updated on 14 August 2020
So many of us love oranges. Bursting with tarty-sweet taste that kids love, and a vitamin C branding that adults crave, they are a clear fruit shop favourite. But of course, all this fandom is reserved for the pulp. As for their skin – that has very few takers.
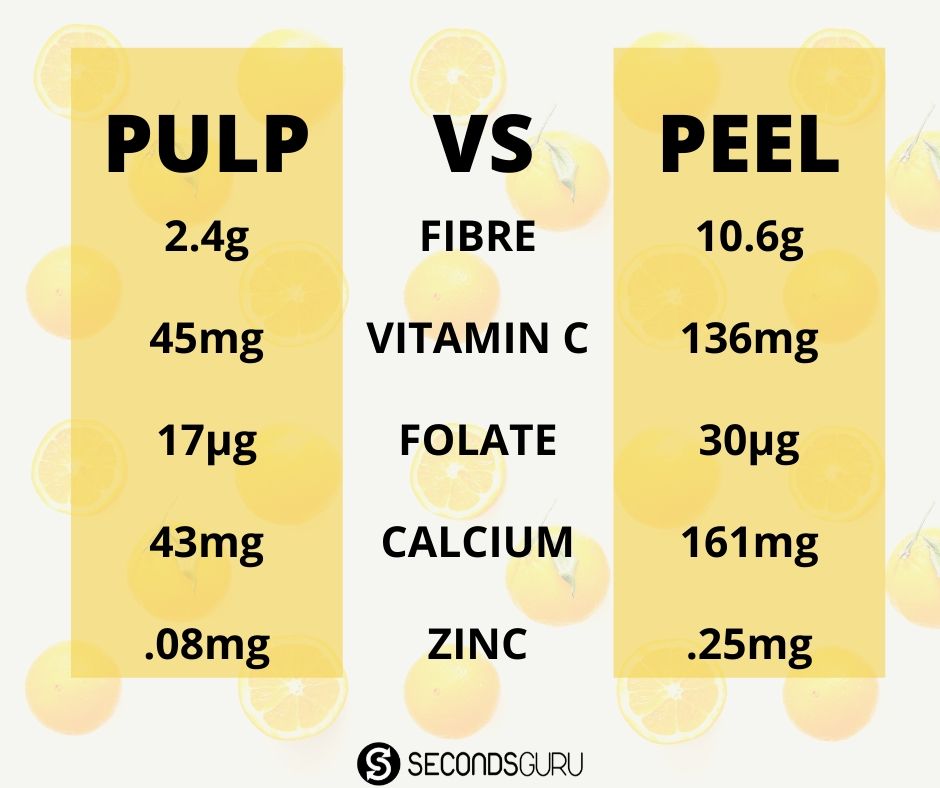
But what if I told you that in the peel vs orange nutrition comparison, the peel actually wins? And it wins hands down! With 4 times the fiber and 3 times the vitamin C, there is in fact a great case to eat the rind while you hand out the fruit. What’s more, research suggests that polyphenols – a class of micronutrients- in the peel give health benefits that include even reduced risk of cancer.
Don’t know about you, but that almost compelled me to munch on the raw peel straightaway. Almost. Plus, it spurred me on to seek recipes that use peels so they can meet my taste bud requirements and reach my plate! In this quest, I also discovered that the orange’s skin is refreshingly versatile: the bright, zesty rind has fragrance as well as essential oils that are useful all the way from DIYs to cleaning.
Zeroing down, here are 6 tried-and-tested ideas that not only work the magic, they help you towards living a lower-waste life. Bonus: they are all easy enough for beginners!
For all these recipes, you will need orange peels. Fruits grown pesticide-free would be preferable but not necessary. In any case, do ensure you wash the oranges – preferably with a rinse that clears out the chemical residues [link to article ETL no. 9] – before you begin the peeling process.
#1 Zest
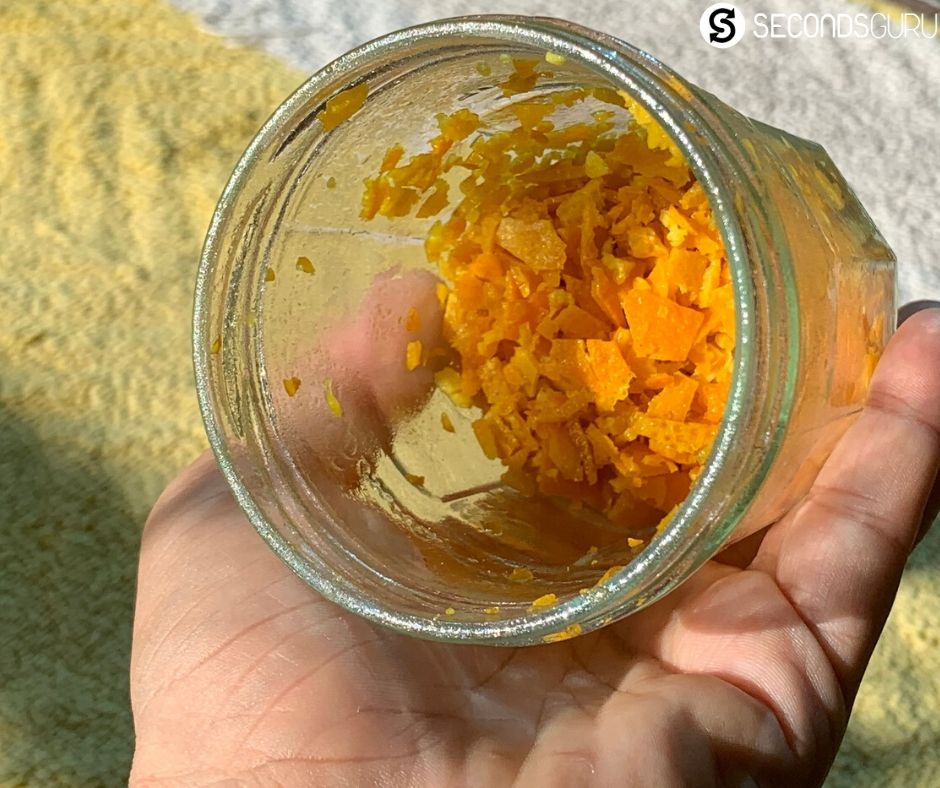
The universally-loved recipes for orange peel involve (no prize for guessing) the zest – which is the grated, bright outer skin of the orange.
How to make:
Use a grater to shred the orange peel; or you can peel the thin rind layer and chop it finely. Avoid the white underside, which is the pith. Separated from the white pith underneath, the zest loses the bitterness while retaining tarty and nutritious flavonoids. If there’s more zest than you can use right away – simply store it in an airtight container in the fridge.
Store zest in the fridge/freezer to keep it handy for your recipes!
How to use:
- Raw: Sprinkle over salads, dressings, yogurt, tea
- Cooked: The tangy zest is a welcome addition to several vegetables, stews and non-vegetarian dishes.
- Baked: Again, there are way too many options out there! From a generous use in the orange cake to sprinkling on biscuits / tarts – you’ll be spoiled for choice when you go Google searching
- Fermented: Are you a gut-health lover and brew your own Kombucha tea? Whether you use green tea or black tea for the brew, once your fermented kombucha is ready to be refrigerated- add orange rest or diced remains of the peel (yes, yes, after juicing the orange). Let it chill and drink as usual.
#2 Powder Food
How to make:
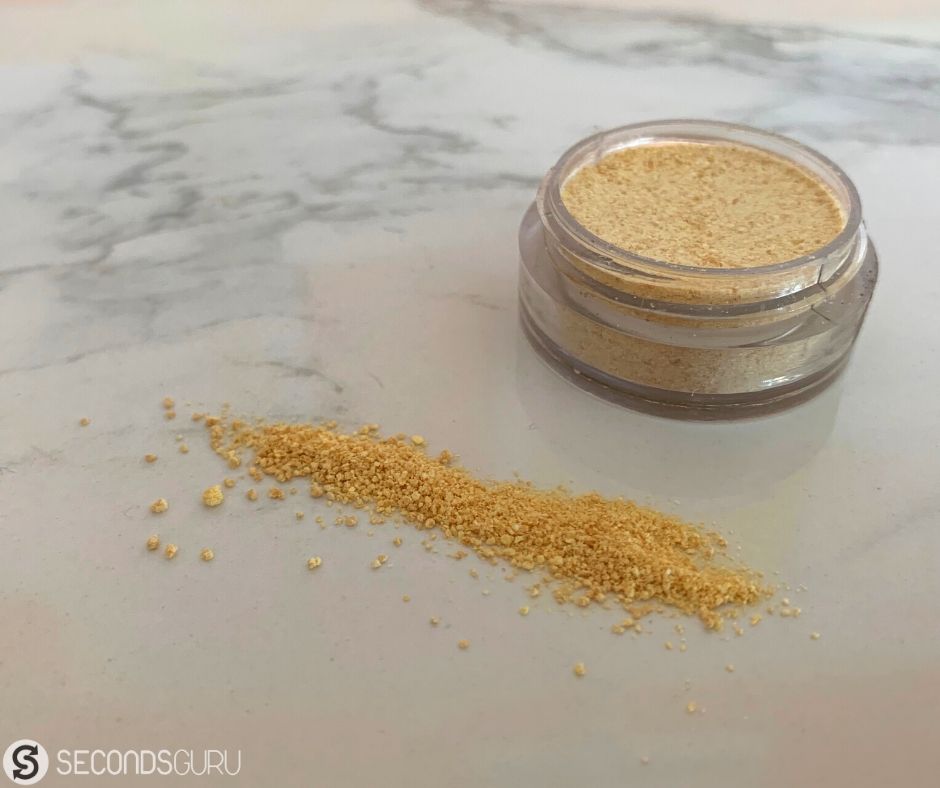
Lay out the clean peel in the sun. Ensure that you place the rind white-side-up so you can retain the bright colours. You are aiming for the skin to lose the moisture, but it doesn’t need to get hard. This can take about 4 hours of bright, direct sun, or longer if you face cloudy skies. Once the peel feels dry enough, grind it to create powder. Store in an air tight jar (old condiment bottles serve perfectly!) in room temperature.
How to use:
The powder isn’t rich in nutrients as the raw peel is (For instance – the Vitamin C is lost to heat and air exposure). But it certainly retains the citric zest! Plus, it is true easiest way to add small doses of orange peel to your daily diet.
- Sprinkle it on salads
- Add it to a shallow bowl of olive oil and serve as a side to focaccia
- Secret recipe from my kitchen: Use it as a topping for homemade chocolate bars along with chilli flakes and salt! Yes it sounds crazy, yes it tastes awesome! See the video below for a quick and easy recipe – and you will realise that the toppings are entirely an independent decision left to your taste buds.
#DoTryThisAtHomeIn our experience, #Stayingin is a lot easier if it involves a generous helping of sweets ? And if you can whip them up yourselves with minimum effort – well, Hallelujah! So here’s us with a Friday share that requires the skill level of just a standard noob, and the occasion of no reason at all..Video here has our co-founder @anujabyotra guiding her 8-yr-old to make a *chocolate bark*. Traditionally, this thin brick of melted chocolate is topped with nuts, but our chef prefers a drizzle of chillies with a garnish of edible hibiscus instead!.Read bit.ly/TRYsweet and Bit.ly/VEGANpopsicle if u want more sweet (and low white sugar) ideas! Shout out to @Scoopwholefoodssingapore where we bought the chocolate covertures – these yummies have long been absent from our closest supermarket!.#greenlivingmadeeasy #Supportlocal #sweettooth
Posted by Secondsguru on Thursday, May 28, 2020
#3 Infused Vinegar
How to make:
Take a wide-necked glass jar and loosely drop in orange peels to fill it to one-thirds (fresh peel is good, you needn’t dry it). Pour vinegar to top. Optionally, add 1-2 cinnamon sticks. Let the jar stand in a shaded part of the home for a month. Test the whiff – by now you should be smelling tarty orange and not the pungent vinegar (or else bottle the mix for longer). Remove the peel and sticks when done.

How to use:
Vinegar is the fundamental cleaning agent you need if you are practicing (or aiming to change to) non-toxic cleaners. Paired with baking soda and castile soap, it has many avatars targeting many chores. When you add orange peel to the mix, you not only get a pleasant aroma (nice to have) but also a deterrent to ants and other insects (that’s a superpower!). Here’s how you can use your now-infused vinegar:
- Vinegar’s most popular use is to unclog drains, in tandem with baking soda [sprinkle 1/2 cup soda over the drain or sink hole, followed by a cup of vinegar].
- At my home, vinegar also doubles up as a glass cleaner. For this you need a a spray bottle, in which you mix equal amounts of infused vinegar and water.
- Pro tip: Spray the vinegar on grout-prone areas (such as shower corners) on a daily basis to prevent slime from forming. Use to clean cabinets to prevent mold and nasty smells. It’s also a great disinfectant to be used over tiled surfaces ( do not use on natural stone such as granite and marble).
#4 Traditional recipes starring rind
The tarty rind seems like an unlikely chief guest as a main ingredient – but traditional cooking has in fact not bypassed them by! Perhaps this is thanks to the zero-waste credos of olden day cooking, or another example of the astute know-how of earlier times when food was medicine in fact and not just in phrase. Some of these dishes continue to be relevant in a modern table setting and I felt they deserve their open place in this article (separate from zest and powder which are additions rather than central to recipes)
Herbal tea /following from Chinese heritage/
At my home, we simply add the rind along with cinnamons to boiling water for a few minutes, then let cool. The aromatic water can be sipped through the day.
Marmalades /following from European heritage/
I really meant to try a recipe and share in this article, but oops – the amount of sugar it called for left me saturated on just reading! Nevertheless, if cheese and toasts are your thing, then marmalade is a worthwhile addition to your platter. My go-to site for recipes is All Recipes – what’s yours?
Cooked chutneys and pickles /following from Indian heritage/
Indian recipes I found stood apart in the way they sought to balance the tarty orange with spice rather than sugar. For instance, the Gojju which involved cooking the rind with red chillies, curry leaves, mustard seeds and many more strong flavours! Below is the recipe that worked for me, but a quick disclaimer – Picking whole fruits Indian-style is not easy for a newbie, so suggest you to try this at home only if you have experience with Indian cooking. Begin with a small batch to test!
#5 Brightening Scrub
How to make:
The process is similar to the powerfood recipe detailed earlier, i.e. sun the peel over 1-2 days and then grind the dried peel. However, as this powder is to be used as a skin scrub, it is important that the grind is very fine.
How to use:
The peel powder is a great replacement for store-bought exfoliants in your toiletries kit.
- Use as-is with water on your face; or you can choose to add the powder to the lather when using your regular face wash. Scrub gently and wash off for brighter skin and refreshing fragrance
- If you make your own soap, add this as an ingredient for an authentic, citric whiff.
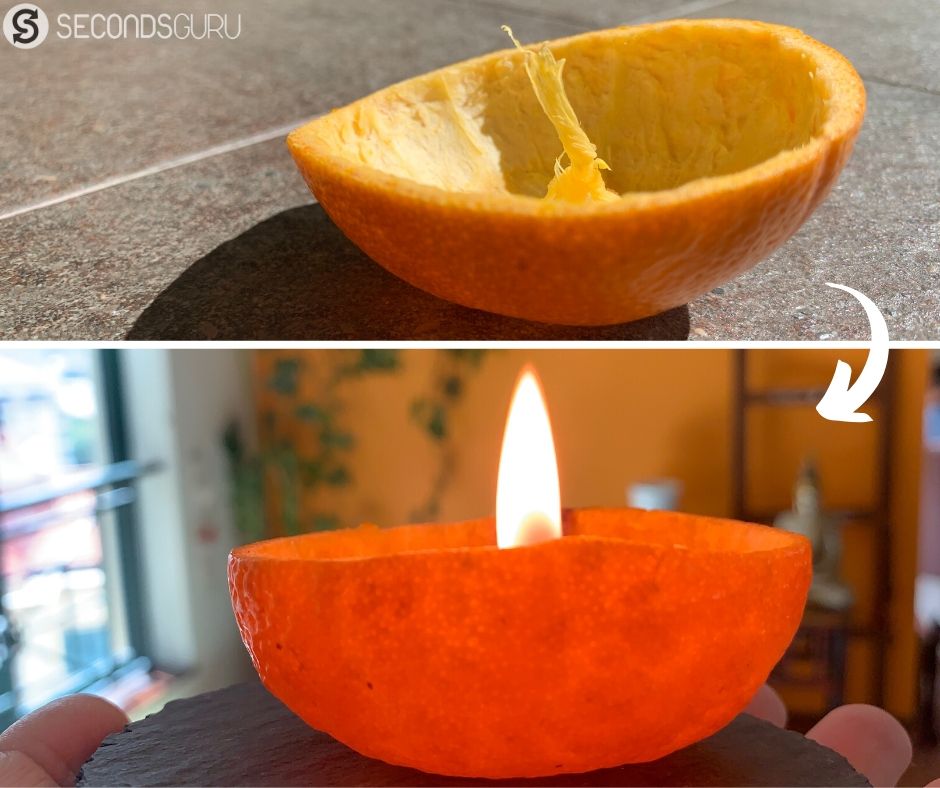
#6 Candle
Starting with a disclaimer here: this DIY does not give you the nutrient nor fragrance benefits of the orange peel! It does however give you a beautiful candle-light, way prettier than the single-use tea lights we often resort to amp up the home decor. As an added bonus – you are reusing old peels one additional time before they go to the compost/kitchen bin.
How to make:
Halve the orange neatly and spoon out the pulp. Try to keep the middle string of the orange intact – then use it to wrap / support a cotton wick around. Add oil into the orange peel, ensuring that the wick is doused too. Add 2 drops of essential oils such as citronella or eucalyptus for the added benefit of warding off mosquitoes and small insects.
How to use:
Dim the lights, and match up the wick for a lovely candle light!
What not to do
- Do not use old or dry peels. Orange skin that’s within a day old looks fresher while the older peels lack appeal. Moreover, old peels with their own essential oil can catch fire if your wick loses balance and falls over.
- Do not use the pith fibres in the middle of the orange to light up. Though many tutorials online claim that it can be used as the candle’s wick – this is just doesn’t work; which is why we are I suggest using it only to support the wick
That brings me to the end of my current repertoire. What about you? Share in comments if you have your own tips and tricks to share! And if you try any of ours, we’d love to read your feedback too!


0 Comments